Automate your $gui!
I've recently been thinking about processes I do all the time that could potentially be automated. I found that any time I created a ScanlineRender node, I always added the $gui expression to its samples knob. So, why not automate that? Here's my solution code for your menu.py first, explanation below):
 1def guiSR():
 2
 3    n = nuke.thisNode()
 4    n.addKnob(nuke.Double_Knob('guiSamples', "GUI Samples"))
 5    n.addKnob(nuke.Double_Knob('renderSamples', "Render Samples"))
 6
 7    n['guiSamples'].setValue(1)
 8    n['renderSamples'].setValue(16)
 9    n['samples'].setExpression("$gui?guiSamples:renderSamples")
10
11nuke.addOnUserCreate(guiSR, nodeClass="ScanlineRender")
If you haven't already read my tutorial about addOnCreate(), you should start there, as it dives deeper into what this code is doing. You may notice that we're using addOnUserCreate() in this example -- the only difference is, addOnCreate() is executed every time a specific class of node is created, whereas addOnUserCreate() is executed only when a user creates the node. It's a subtle but important difference.
To explain the code above, we're defining a function called guiSR(), which includes a set of instructions to run any time the function is executed. These instructions are:
- Add two new knobs to our ScanlineRender node -- one for GUI samples and one for Render samples.
-
Set knob defaults:
- GUI Samples = 1
- Render Samples = 16
$guiexpression on the samples knob
In English, the $gui expression reads: "if we're processing this knob in the Viewer, set the value to whatever value is in the guiSamples knob. Otherwise, when rendering, set the value to whatever value is in the renderSamples knob.
Lastly is our addOnUserCreate() function, which we're using to assign our guiSR() function to every future ScanlineRender node that we create. Add the above code snippet to your menu.py, restart Nuke, and you'll see the new feature in action!
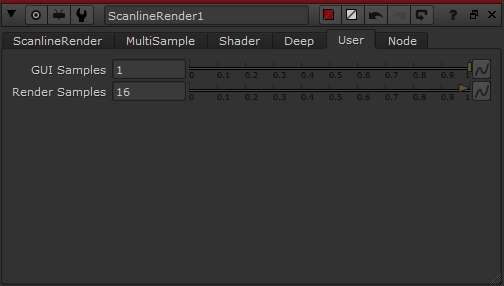
Pretty simple, right?
Let's take it one step further with a crazy example. Let's say you've got a 1000 frame long, fully-CG shot with stuff flying around everywhere. You want motionblur in your final comp, although because of how many layers you have, turning motionblur on slows things down significantly. What if you could control all the samples on all the nodes in one click?
Let's create a new tool!
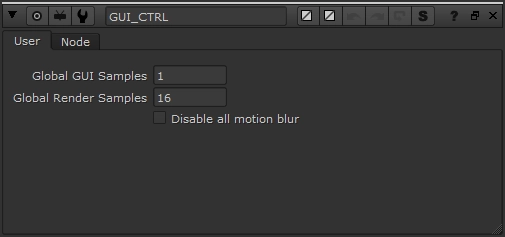
Start by creating a Group (ctrl+g), and change the name Group1 to GUI_CTRL. Right-click and choose Manage User Knobs. Add two Integer knobs -- (one for GUI samples and one for Render samples), as well as a Checkbox knob to disable the expression.
When you add a new user knob, there is an important distinction between the Name and the Label. Label is what the user sees the knob is called, whereas Name is how you reference the knob with python. This will become clear in a second...
I've Labelled & Named my knobs as follows:
Global GUI Samples guiSamples
Global Render Samples renderSamples
Disable all motion blur disableSamples
Your Group node should now resemble the image below.
Now we need to run some Python to connect all the relevant nodes in our future Nuke scripts to our GUI panel. Although, rather than having to save a code snippet to run every time, how about we just create a button on our gizmo that adds the relevant code to the relevant nodes/knobs for us?
Back in Manage User Knobs, add a Python Script Button, and add the following code to the Script text box (I've commented each section to illustrate how it's working):
 1# Create dictionary for Node Class : knob name that controls motionblur samples. You can add or remove any nodes you want to affect here.
 2dict = {'Transform':'motionblur', 'TransformMasked':'motionblur', 'Tracker4':'motionblur', 'CornerPin2D':'motionblur', 'Card3D':'motionblur', 'ScanlineRender':'samples'}
 3
 4# Look at all nodes in the current nuke script, then:
 5for i in nuke.allNodes(group=nuke.root()):
 6    # Select all nodes by the Node Class listed in our above dictionary
 7    for x in dict:
 8        # If a motionblur-related knob is animated, or already has an expression, we will ignore it.
 9        if i.Class() == x and i[dict[x]].isAnimated() != 1 and i[dict[x]].hasExpression() == 0:
10            # For the remaining nodes that meet our requirements, we add the expression that links the relevant motionblur samples knob to our GUI_CTRL gizmo!
11            nuke.toNode(i.name())[dict[x]].setExpression("GUI_CTRL.disableSamples==1?0:$gui?GUI_CTRL.guiSamples:GUI_CTRL.renderSamples")
Just to be safe, we should add a second Python Script Button to remove all the expressions that the first button adds, in case we ever need to. Here's the code (commented, again):
 1# Create dictionary for Node Class : knob name that controls motionblur samples. You can add or remove any nodes you want to affect here.
 2dict = {'Transform':'motionblur', 'TransformMasked':'motionblur', 'Tracker4':'motionblur', 'CornerPin2D':'motionblur', 'Card3D':'motionblur', 'ScanlineRender':'samples'}
 3n = nuke.thisNode()
 4
 5# Find all the nodes that are dependent (aka have expression links) to our GUI_CTRL gizmo
 6for i in n.dependent():
 7    # Select all nodes by the Node Class listed in our above dictionary
 8    for x in dict:
 9        if i.Class() == x:
10            # Remove all keyframes & expressions from our relevant motionblur knobs.
11            nuke.toNode(i.name())[dict[x]].clearAnimated()
12            # Set relevant motionblur knob's value back to zero.
13            nuke.toNode(i.name())[dict[x]].setValue(0)
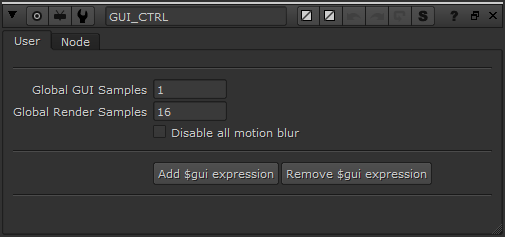
Here's what the end result should look like. I've added some dividers for the sake of being tidy.
Time to test our creation! Add a slew of nodes, some with motionblur controls and some without (Grades, etc.). Press the buttons, play with all the controls, and make sure it all works!


Last step, let's save this Group as a "Gizmo" and add a menu in our menu.py so we can access this tool easily.
In our GUI_CTRL Group, click on the Node tab, then press the export as gizmo... button. Name it GUI_CTRL and save it to your .nuke folder. Now, we don't actually want this to be a Gizmo, because custom Gizmos usually cause problems with different studios' pipelines and render farms. Let's open GUI_CTRL.gizmo in a text editor and fix it.
- Change the line near the top that says
Gizmo {to beGroup { - Add a new line right underneath that says
name GUI_CTRL(leave out the quotation marks)
When a gizmo is a gizmo, it grabs its name from the filename. But when it's a Group, for some reason, you have to specify a name manually...
Now let's add the gizmo to a menu. Open up your menu.py, and add the following (commented for clarity):
1# Add a menu to the top bar of Nuke (where File, Edit, etc. lives). Give the menu a name of utilitiesMenu so we can reference it & add things to it.
2utilitiesMenu = nuke.menu('Nuke').addMenu('Utilities')
3# Add a menu option labelled $gui helper, and create the node/gizmo called GUI_CTRL when clicked
4utilitiesMenu.addCommand('$gui helper', 'nuke.createNode("GUI_CTRL")')
Restart Nuke, and you should see a Utilities menu up top, with the $gui helper option!
If you're not into learning and just into using the tools, or your code isn't working for some reason, copy/paste the following into Nuke for the final tool!
 1set cut_paste_input [stack 0]
 2version 10.0 v4
 3Group {
 4name GUI_CTRL
 5inputs 0
 6name GUI_CTRL
 7help "Useful for globally controlling motionblur samples. Keeps Viewer (GUI) & Render samples seperate for the sake of speed."
 8selected true
 9xpos -146
10ypos -621
11addUserKnob {20 User}
12addUserKnob {26 ""}
13addUserKnob {3 guiSamples l "Global GUI Samples"}
14guiSamples 1
15addUserKnob {3 renderSamples l "Global Render Samples"}
16renderSamples 16
17addUserKnob {6 disableSamples l "Disable all motion blur" +STARTLINE}
18addUserKnob {26 ""}
19addUserKnob {22 guiAdd l "Add $gui expression" T "dict = {'Transform':'motionblur', 'TransformMasked':'motionblur', 'Tracker4':'motionblur', 'CornerPin2D':'motionblur', 'Card3D':'motionblur', 'ScanlineRender':'samples'}nnnfor i in nuke.allNodes(group=nuke.root()):n    for x in dict:n        if i.Class() == x and i[dict[x]].isAnimated() != 1 and i[dict[x]].hasExpression() == 0:n            nuke.toNode(i.name())[dict[x]].setExpression("GUI_CTRL.disableSamples==1?0:$gui?GUI_CTRL.guiSamples:GUI_CTRL.renderSamples")" +STARTLINE}
20addUserKnob {22 guiRmv l "Remove $gui expression" -STARTLINE T "dict = {'Transform':'motionblur', 'TransformMasked':'motionblur', 'Tracker4':'motionblur', 'CornerPin2D':'motionblur', 'Card3D':'motionblur', 'ScanlineRender':'samples'}nn = nuke.thisNode()nnfor i in n.dependent():n    for x in dict:n        if i.Class() == x:n            nuke.toNode(i.name())[dict[x]].clearAnimated()n            nuke.toNode(i.name())[dict[x]].setValue(0)"}
21addUserKnob {26 ""}
22addUserKnob {20 info l Info}
23addUserKnob {26 ""}
24addUserKnob {26 versionInfo l "" +STARTLINE T "nCreated by Ben McEwannwww.benmcewan.comnnVersion 1.0nLast Updated: September 19th, 2018n"}
25addUserKnob {26 ""}
26}
27Output {
28inputs 0
29name Output1
30selected true
31xpos 0
32ypos 300
33}
34end_group
If you liked this post, and would like to gain a better understanding of the fundamentals of Python in Nuke, check out my course: Python for Nuke 101.