Power Up Your Contact Sheets
Contact sheets are something I use all the time to run out wedges of certain looks & compare my work against other shots in the sequence. Although, the Contact Sheet node is kind of... basic. It lacks a few features & requires a lot of initial setup to actually be useful. The aim of this article is to share some knowledge on the defaults I have in my contact sheet node & how to set contact sheets up more-speedily.
First, let's look at the Contact sheet node itself and note a few things.
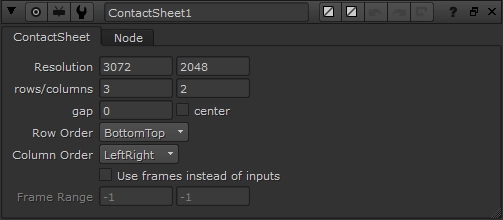
- Upon creating this node, my format is set to 3072 x 2048. Why is the resolution of the contact sheet so wrong?
- 3 rows and 2 columns gives us 6 images. I usually only need 4 at most, but this seems like an arbitrary default
- Does anyone read a book from bottom to top? Not sure why the Row Order is set to that...
Let's fix this. We can add a couple lines of Python in our menu.py to make these defaults more sensible & to do some heavy lifting for us.
1nuke.knobDefault("ContactSheet.width", '{"input.width * columns"}')
2nuke.knobDefault("ContactSheet.height", '{"input.height * rows"}')
3nuke.knobDefault("ContactSheet.roworder", 'TopBottom')
4nuke.knobDefault("ContactSheet.colorder", 'LeftRight')
5nuke.knobDefault("ContactSheet.rows", '{"ceil(inputs/columns)"}')
6nuke.knobDefault("ContactSheet.columns", '{"ceil(sqrt(inputs))"}')
I'll explain what's going on line-by-line:
Line 1 is setting the width of the Contact Sheet to whatever is plugged into the first input, multiplied by the number of columns. If we have 2 images side-by-side, it makes sense to keep them at their original resolution to start with. By adding the curly brackets with quotation marks inside, we're telling Nuke that we want these values to be an expression rather than just to use the value. This will keep the knob value updating as we plug / unplug things.
Line 2 is the same thing as Line 1, except we're setting the height of the Contact Sheet, multiplied by the number of rows.
Line 3 is changing our Row Order knob to go Top to Bottom. Much more sensible.
Line 4 is setting the Column Order knob to be Left to Right. This is the default, but it doesn't hurt to set whilst we're here, just in case a studio has any different settings in their global Nuke environment menu.py
Line 5 is where things start to get exciting. We're setting an expression on the rows knob that will automate what this value should be! Starting in the middle of the parentheses, inputs is counting how many inputs the Contact Sheet node has plugged in. We're then dividing it by the value of the columns knob. We're wrapping up this simple expression with ceil, which rounds the value up to the highest integer (round number). This is needed for when we have an un-even number of inputs connected to our Contact Sheet. For example, if we have 3 inputs, the expression inside the parentheses would return 1.5. Because the Contact Sheet can't display half an image, it would just return 1. Using ceil round this decimal up to 2!
Line 6 is automating what the value of the columns knob should be. We've already covered what ceil does, and the rest is simple. We're finding the square root of the number of connected inputs. After adding these 6 lines into your menu.py, restart Nuke and create a Contact Sheet node. Try plugging multiple inputs in and watch the magic happen!
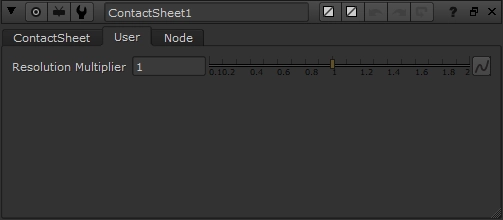
However, there is a downside to this. What if you want to make a Contact Sheet of the 2K plates for every shot in a sequence -- let's say 30 shots. Your Contact Sheet's resolution will be humongous, and it'll take an age to load! Using Python, we can add a resolution multiplier to scale this back down.
 1def OnCScreation():
 2
 3    cs = nuke.thisNode()
 4    k = nuke.Double_Knob('resMult', "Resolution Multiplier")
 5    k.setRange(0.1,2)
 6    k.setValue(1)
 7
 8    if cs != None:
 9        cs.addKnob(k)
10
11nuke.addOnCreate(OnCScreation, nodeClass="ContactSheet")
We're starting by creating a function, which we're naming OnCScreation. This function:
- Looks at the current node
- Assigns a Floating Point Slider knob called 'resMult' with a human-readable label "Resolution Multiplier", to the variable
k - Sets the range of the slider from 0.1 to 2 (gives us the flexibility to go down to 1/10th the resolution, or double)
- Sets the default value of this slider to 1
- Does a small bit of error-checking to make sure the "current node" is not equal to None, then
- Creates the Floating Point Slider knob, as we defined above.
- Our last line is saying: when a node with the class "ContactSheet" is created, run the
OnCScreationfunction.
Add the code to your menu.py, restart Nuke, and create a new Contact Sheet node. You'll see a User tab with our fancy new slider!
Although, we haven't hooked it up to anything yet. Let's go back to our first two lines of code and modify them to take this slider into account.
1nuke.knobDefault("ContactSheet.width", '{"input.width * columns<span style="color: #ff0000;"> * resMult</span>"}')
2nuke.knobDefault("ContactSheet.height", '{"input.height * rows<span style="color: #ff0000;"> * resMult</span>"}')
We're adding a second multiplication to our expression, to multiply the value of our slider by the value of the rest of the expression. Simple! Here is our final code for our automatic Contact Sheet!
 1# CONTACT SHEET MODIFICATION
 2
 3nuke.knobDefault("ContactSheet.width", '{"input.width * columns * resMult"}')
 4nuke.knobDefault("ContactSheet.height", '{"input.height * rows * resMult"}')
 5nuke.knobDefault("ContactSheet.roworder", 'TopBottom')
 6nuke.knobDefault("ContactSheet.colorder", 'LeftRight')
 7nuke.knobDefault("ContactSheet.rows", '{"ceil(inputs/columns)"}')
 8nuke.knobDefault("ContactSheet.columns", '{"ceil(sqrt(inputs))"}')
 9
10def OnCScreation():
11
12    cs = nuke.thisNode()
13    k = nuke.Double_Knob('resMult', "Resolution Multiplier")
14    k.setRange(0.1,2)
15    k.setValue(1)
16
17    if cs != None:
18        cs.addKnob(k)
19
20nuke.addOnCreate(OnCScreation, nodeClass="ContactSheet")
Let's not stop there -- how about we create defaults for different types of text we might want to add? How about we also add a menu option to automatically create this text & hook up our fancy new automated contact sheet node to a selection of nodes in our GUI?
Here is the final code, commented for clarity! Add it to your menu.py, restart Nuke, and voila!
Note: there are a few double-ups in my code for the sake of clarity. Feel free to combine everything into one function for speed & efficiency!
  1# --------------------------------------------------------------
  2#  autoContactSheet.py + csTextShortcuts()
  3#  Version: 0.2.0
  4#  Last Updated: August 23rd, 2018
  5# --------------------------------------------------------------
  6
  7
  8# --------------------------------------------------------------
  9#  USAGE:
 10#
 11# - Sets better defaults for the ContactSheet node in nuke, to automate all of the settings
 12# - Creates a second text node option that automatically sets bounding box & label
 13# - Finally, combines all this code together (and repeats in some areas for clarity) to make a fully-automatic ContactSheet node with the click of a button!
 14#
 15#  Add this to menu.py
 16# --------------------------------------------------------------
 17
 18# ----- CREATE BETTER CONTACT SHEET DEFAULTS -------------------------------
 19
 20# Sets relevant expressions in relevant knobs to automagically figure out the contact sheet's resolution, rows, columns, etc.
 21nuke.knobDefault("ContactSheet.width", '{"input.width * columns * resMult"}')
 22nuke.knobDefault("ContactSheet.height", '{"input.height * rows * resMult"}')
 23nuke.knobDefault("ContactSheet.roworder", 'TopBottom')
 24nuke.knobDefault("ContactSheet.colorder", 'LeftRight')
 25nuke.knobDefault("ContactSheet.rows", '{"ceil(inputs/columns)"}')
 26nuke.knobDefault("ContactSheet.columns", '{"ceil(sqrt(inputs))"}')
 27
 28# We have to define a function, which will be used to add the resolution multiplier knob.
 29def OnCScreation():
 30
 31    cs = nuke.thisNode()
 32    k = nuke.Double_Knob('resMult', "Resolution Multiplier")
 33    k.setRange(0.1,2)
 34    k.setValue(1)
 35
 36    if cs != None:
 37        cs.addKnob(k)
 38
 39# addOnCreate function says, "when I create a contact sheet node, run the OnCScreation fuction"
 40nuke.addOnCreate(OnCScreation, nodeClass="ContactSheet")
 41
 42
 43
 44# ----- CREATE TEXT NODE SHORTCUTS -------------------------------
 45
 46# Define the function
 47def csTextShortcuts():
 48
 49    nodes = nuke.selectedNodes()
 50
 51    for node in nodes:
 52
 53        # Checks whether the class of the selected node/nodes is a Read node or something else, and sets a variable which we will use to label our text nodes accordingly a bit later...
 54        if node.Class() == "Read":
 55            textValue = " [basename [file rootname [value [topnode].file]]]"
 56        else:
 57            textValue = " [value input.name]"
 58
 59        # Creates a text node underneath every selected node & connects its input accordingly
 60        textNode = nuke.createNode("Text2")
 61        textNode.setInput(0, node)
 62
 63        # Set the bbox of the text node to match the input format
 64        textNode['box'].setValue(0, 0)
 65        textNode['box'].setValue(0, 1)
 66        textNode['box'].setExpression("input.width", 2)
 67        textNode['box'].setExpression("input.height", 3)
 68        textNode['xjustify'].setValue("left")
 69        textNode['yjustify'].setValue("bottom")
 70
 71        # Add relevant label as per the if/else statement above
 72        textNode['message'].setValue(textValue)
 73        textNode['label'].setValue('[value message]')
 74
 75        # Force an update of the GUI to make sure labels are displayed correctly
 76        nuke.updateUI()
 77
 78# Add our Text Autolabel node to the Draw menu
 79nuke.menu("Nodes").addCommand("Draw/Text (Autolabel)", 'csTextShortcuts()')
 80
 81
 82
 83# ----- AUTOMATIC CONTACT SHEET -------------------------------
 84
 85def autoContactSheet():
 86
 87    # Start by creating lists to hold certain information -- this will become clear as we get into things
 88    nodeList = []
 89    xVals = []
 90    yVals = []
 91
 92    # Loop through all selected nodes in the node graph
 93    for node in nuke.selectedNodes():
 94
 95        # Checks whether the class of the selected node/nodes is a Read node or something else, and sets a variable which we will use to label our text nodes accordingly a bit later...
 96        if node.Class() == "Read":
 97            textValue = " [basename [file rootname [value [topnode].file]]]"
 98        else:
 99            textValue = " [value input.name]"
100
101        # Creates a text node underneath every selected node & connects its input accordingly
102        textNode = nuke.createNode("Text2")
103        textNode.setInput(0, node)
104
105        # Set the bbox of the text node to match the input format
106        textNode['box'].setValue(0, 0)
107        textNode['box'].setValue(0, 1)
108        textNode['box'].setExpression("input.width", 2)
109        textNode['box'].setExpression("input.height", 3)
110        textNode['xjustify'].setValue("left")
111        textNode['yjustify'].setValue("bottom")
112
113        # Add relevant label as per the if/else statement above
114        textNode['message'].setValue(textValue)
115        textNode['shadow_opacity'].setValue('1')
116        textNode['label'].setValue('[value message]')
117
118        # Add selected nodes to a list
119        nodeList.append(textNode)
120
121        # Add the X and Y position of all selected nodes to their respective lists
122        xVals.append(node['xpos'].value())
123        yVals.append(node['ypos'].value())
124
125
126    # Create a contact sheet node. This will come in with the new defaults we set above!
127    cs = nuke.createNode("ContactSheet")
128
129    # Add custom knobs to the User tab to allow some control of our text nodes (User tab is created automatically by Nuke)
130    cs.addKnob(nuke.Text_Knob('',''))
131    cs.addKnob(nuke.Boolean_Knob('showText', 'Show Text', True))
132    textBG_ops = "None", "Shadow", "Solid"
133    cs.addKnob(nuke.Enumeration_Knob('textBG', 'Text Background', textBG_ops))
134    cs.addKnob(nuke.Double_Knob('textSize', 'Text Size'))
135    cs['textSize'].setValue(1)
136    cs.addKnob(nuke.Text_Knob('',''))
137
138    iterator = 0
139
140    # Add relevant expressions to our text nodes, so the Text size & background options work as expected
141    for nodes in nodeList:
142
143        cs.setInput(iterator, nodes)
144        nodes['enable_background'].setExpression(cs['name'].value()+".textBG == 2 ? 1 : 0")
145        nodes['enable_shadows'].setExpression(cs['name'].value()+".textBG == 1 ? 1 : 0")
146        nodes['disable'].setExpression(cs['name'].value()+".showText == 1 ? 0 : 1")
147        nodes['global_font_scale'].setExpression(cs['name'].value()+".textSize")
148
149        iterator = iterator + 1
150
151    # Find the average of all selected nodes' X and Y positions
152    avgXpos = sum(xVals) / len(nodeList)
153    avgYpos = sum(yVals) / len(nodeList)
154
155    # Force set the position of our newly created contact sheet in the node graph
156    cs['xpos'].setValue(avgXpos)
157    cs['ypos'].setValue(avgYpos+200)
If you liked this post, and would like to gain a better understanding of the fundamentals of Python in Nuke, check out my course: Python for Nuke 101.