Backdrop Node Presets
Humans are creatures of habit. To align with this mindset, I have created a python script that enables compositors to set Backdrop Node presets in their menu.py!
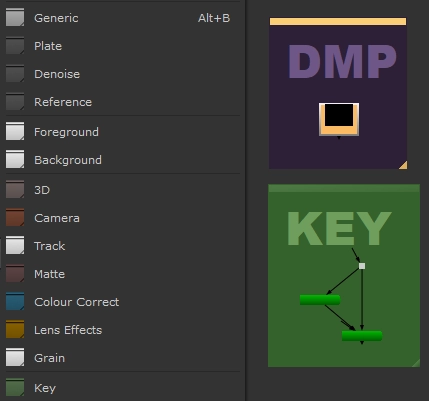
I appreciate having consistent defaults, as it helps our lizard brains instantly recognize what is what at a glance, without thinking about it. If I'm zoomed out all the way on a massive Nuke script, I know the green areas are Keys, purple areas are DMPs, etc. etc.
Scroll down to see the code, or Click here if you simply want to download the code, the presets I've set in my own menu.py, and all the coloured icons.
You may notice the defaultBackdrop() function has a few parameters, that help control things:
- Name: The label of your BackdropNode to display in the node graph
- bgColR: Red value of the BackdropNode's colour
- bgColG: Green value of the BackdropNode's colour
- bgColB: Blue value of the BackdropNode's colour
- tColR: Red value of the text colour
- tColG: Green value of the text colour
- tColB: Blue value of the text colour
- zIndex: Controls layering in relation to other Backdrop Nodes
These parameters control the aspects we want to change when we create the presets in our menu.py. Speaking of, let's dive into the code and see how it all works! I've commented the code, to make it more human-readable.
1# --------------------------------------------------------------
2# defaultBackdrop.py
3# Version: 1.1.0
4# Last Updated: January 11th, 2018
5# --------------------------------------------------------------
6
7
8# --------------------------------------------------------------
9# USAGE:
10#
11# Creates a set of default backdrop nodes to help quickly label different sections of a nuke script.
12# --------------------------------------------------------------
13
14
15# --------------------------------------------------------------
16# BACKDROP NODE SHORTCUTS :::::::::::::::::::::::::::::::::::::
17# --------------------------------------------------------------
18
19import nuke
20
21def defaultBackdrop(name, bgColR, bgColG, bgColB, tColR, tColG, tColB, zIndex, nodes = None):
22
23 # Define Colors. The numbers have to be integers, so there's some math to convert them.
24 bgColor = int('%02x%02x%02x%02x' % (bgColR*255,bgColG*255,bgColB*255,255),16)
25 textColor = int('%02x%02x%02x%02x' % (tColR*255,tColG*255,tColB*255,255),16)
26
27 if nodes is None:
28 nodes = nuke.selectedNodes()
29 if len(nodes) == 0:
30 n = nuke.createNode("BackdropNode")
31 return n
32
33 # Calculate bounds for the backdrop node.
34 bdX = min([node.xpos() for node in nodes])
35 bdY = min([node.ypos() for node in nodes])
36 bdW = max([node.xpos() + node.screenWidth() for node in nodes]) - bdX
37 bdH = max([node.ypos() + node.screenHeight() for node in nodes]) - bdY
38
39 # Expand the bounds to leave a little border. Elements are offsets for left, top, right and bottom edges respectively
40 left, top, right, bottom = (-70, -140, 70, 70)
41 bdX += left
42 bdY += top
43 bdW += (right - left)
44 bdH += (bottom - top)
45
46 # Set backdrop parameters
47 n = nuke.nodes.BackdropNode(xpos = bdX,
48 bdwidth = bdW,
49 ypos = bdY,
50 bdheight = bdH,
51 z_order = zIndex,
52 tile_color = bgColor,
53 note_font_color = textColor,
54 note_font_size=100,
55 label=name,
56 name=' ',
57 note_font='Arial Black')
58
59 # Revert to previous selection
60 for node in nodes:
61 node['selected'].setValue(True)
62
63 # Ensure backdrop is selected, to make moving easier
64 n['selected'].setValue(True)
65
66 nuke.show(n)
67
68 return n
69
70
71
72# Add the following to menu.py
73
74import defaultBackdrop
75
76# ----- CREATE MENU --------------------------------------------------
77# Create a menu in the nodes panel. Uses the default BackdropNode icon, for some nice consistency!
78bmBackdrops = nuke.menu('Nodes').addMenu('bmBackdrops', icon='Backdrop.png')
79
80# Our first Backdrop Node default! Remember the parameters outlines above? That's where these come in.
81# "Generic" is the name that appears in the menu, we're then looking for the defaultBackdrop.py file (the code above) that's saved in our .nuke folder, and we're calling the defaultBackdrop() function from there.
82# " " is setting our label to be blank. In this instance it doesn't need a name.
83# The first set of 3 numbers are the R, G and B values that colour the Backdrop Node (0.267, 0.267, 0.267).
84# The second set of 3 numbers are the R, G and B values that colour the Text in the Backdrop Node (0.498, 0.498, 0.498).
85# Our last parameter, "-5", is our zIndex. It's set to -5, as we want it to be behind every other Backdrop Node in our node graph.
86# Lastly, "alt+b" is setting the keyboard shortcut, and "icon=Backdrop.png" is telling Nuke to use the default Backdrop Node icon as the icon for this menu item.
87bmBackdrops.addCommand('Generic', 'defaultBackdrop.defaultBackdrop(" ", 0.267, 0.267, 0.267, 0.498, 0.498, 0.498, -5)', 'alt+b', icon="Backdrop.png")
88
89# Following the same explanation from our Generic backdrop node, let's populate our menu with a few more. Notice the icon name is different? I've custom-created icons to match the colour of each backdrop node.
90bmBackdrops.addCommand('Plate', 'defaultBackdrop.defaultBackdrop(" PLATE", 0.267, 0.267, 0.267, 0.498, 0.498, 0.498, -1)', icon="/icons/bmBackdrops/BackdropDarkGrey.png")
91bmBackdrops.addCommand('Denoise', 'defaultBackdrop.defaultBackdrop(" DENOISE", 0.267, 0.267, 0.267, 0.498, 0.498, 0.498, -1)', icon="/icons/bmBackdrops/BackdropDarkGrey.png")
92bmBackdrops.addCommand('Reference', 'defaultBackdrop.defaultBackdrop(" REF", 0.267, 0.267, 0.267, 0.498, 0.498, 0.498, -1)', icon="/icons/bmBackdrops/BackdropDarkGrey.png")
93
94bmBackdrops.addCommand('-', "", "") ### Add separator ###
95
96bmBackdrops.addCommand('Foreground', 'defaultBackdrop.defaultBackdrop(" FG", 0.4, 0.4, 0.4, 0.647, 0.647, 0.647, -2)', icon="/icons/bmBackdrops/BackdropLightGrey.png")
97bmBackdrops.addCommand('Background', 'defaultBackdrop.defaultBackdrop(" BG", 0.4, 0.4, 0.4, 0.647, 0.647, 0.647, -2)', icon="/icons/bmBackdrops/BackdropLightGrey.png")
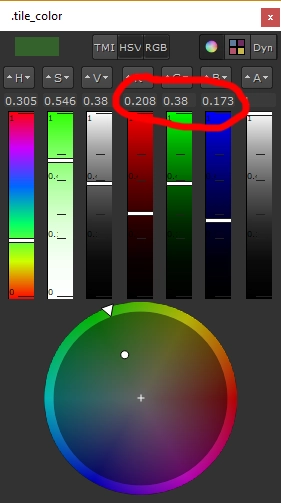
98
99bmBackdrops.addCommand('-', "", "") ### Add separator ###
100
101bmBackdrops.addCommand('3D', 'defaultBackdrop.defaultBackdrop(" 3D", 0.376, 0.286, 0.275, 0.714, 0.427, 0.388, 0)', icon="/icons/bmBackdrops/Backdrop3D.png")
102bmBackdrops.addCommand('Camera', 'defaultBackdrop.defaultBackdrop(" CAM", 0.425, 0.14, 0.078, 1, 0.475, 0.424, 0)', icon="/icons/bmBackdrops/BackdropCamera.png")
103bmBackdrops.addCommand('Track', 'defaultBackdrop.defaultBackdrop(" TRACK", 0.541, 0.541, 0.541, 0.859, 0.859, 0.859, 0)', icon="/icons/bmBackdrops/BackdropLightGrey.png")
104bmBackdrops.addCommand('Matte', 'defaultBackdrop.defaultBackdrop(" MATTE", 0.267, 0.145, 0.145, 0.549, 0.329, 0.329, -1)', icon="/icons/bmBackdrops/BackdropMatte.png")
105bmBackdrops.addCommand('Colour Correct', 'defaultBackdrop.defaultBackdrop(" CC", 0.055, 0.282, 0.459, 0.333, 0.745, 1, 0)', icon="/icons/bmBackdrops/BackdropCC.png")
106bmBackdrops.addCommand('Lens Effects', 'defaultBackdrop.defaultBackdrop(" LENS FX", 0.443, 0.302, 0.02, 0.718, 0.482, 0.031, 0)', icon="/icons/bmBackdrops/BackdropLensFX.png")
107bmBackdrops.addCommand('Grain', 'defaultBackdrop.defaultBackdrop(" GRAIN", 0.541, 0.541, 0.541, 0.337, 0.337, 0.337, 0)', icon="/icons/bmBackdrops/BackdropLightGrey.png")
108
109bmBackdrops.addCommand('-', "", "") ### Add separator ###
110
111bmBackdrops.addCommand('Key', 'defaultBackdrop.defaultBackdrop(" KEY", 0.208, 0.384, 0.173, 0.435, 0.62, 0.357, -1)', icon="/icons/bmBackdrops/BackdropKey.png")
112bmBackdrops.addCommand('Despill', 'defaultBackdrop.defaultBackdrop(" DESPILL", 0.278, 0.31, 0.243, 0.467, 0.522, 0.412, 0)', icon="/icons/bmBackdrops/BackdropDespill.png")
113bmBackdrops.addCommand('Edges', 'defaultBackdrop.defaultBackdrop(" EDGES", 0.067, 0.09, 0.043, 0.255, 0.337, 0.173, 0)', icon="/icons/bmBackdrops/BackdropEdges.png")
114bmBackdrops.addCommand('Paint', 'defaultBackdrop.defaultBackdrop(" PAINT", 0.098, 0.157, 0.063, 0.435, 0.533, 0.337, 0)', icon="/icons/bmBackdrops/BackdropPaint.png")
115bmBackdrops.addCommand('Roto', 'defaultBackdrop.defaultBackdrop(" ROTO", 0.173, 0.243, 0.122, 0.369, 0.518, 0.357, 0)', icon="/icons/bmBackdrops/BackdropRoto.png")
116
117bmBackdrops.addCommand('-', "", "") ### Add separator ###
118
119bmBackdrops.addCommand('CG', 'defaultBackdrop.defaultBackdrop(" CG", 0.149, 0.251, 0.286, 0.31, 0.514, 0.584, -1)', icon="/icons/bmBackdrops/BackdropCG.png")
120bmBackdrops.addCommand('FX', 'defaultBackdrop.defaultBackdrop(" FX", 0.122, 0.161, 0.188, 0.357, 0.494, 0.541, -1)', icon="/icons/bmBackdrops/BackdropFX.png")
121bmBackdrops.addCommand('DMP', 'defaultBackdrop.defaultBackdrop(" DMP", 0.173, 0.129, 0.212, 0.435, 0.341, 0.537, -1)', icon="/icons/bmBackdrops/BackdropDMP.png")
122
123bmBackdrops.addCommand('-', "", "") ### Add separator ###
124
125bmBackdrops.addCommand('Repo', 'defaultBackdrop.defaultBackdrop(" REPO", 0.376, 0.259, 0.435, 0.69, 0.459, 0.733, 0)', icon="/icons/bmBackdrops/BackdropRepo.png")
126bmBackdrops.addCommand('Retime', 'defaultBackdrop.defaultBackdrop(" RETIME", 0.475, 0.467, 0.204, 0.714, 0.698, 0.227, 0)', icon="/icons/bmBackdrops/BackdropRetime.png")
127
128bmBackdrops.addCommand('-', "", "") ### Add separator ###
129
130bmBackdrops.addCommand('Out', 'defaultBackdrop.defaultBackdrop(" OUT", 0.22, 0.212, 0.11, 0.541, 0.533, 0.345, 0)', icon="/icons/bmBackdrops/BackdropOut.png")
Click here to download the code, the presets I've set in my own menu.py, and all the coloured icons.
Tip: When creating your own presets, you can easily find the RGB colour values you want to use by opening a colour picker and copy/pasting the RGB values from there.
If you liked this post, and would like to gain a better understanding of the fundamentals of Python in Nuke, check out my course: Python for Nuke 101.