4 Tips to Improve Neat Video's denoise results!

Neat Video is one of the craziest plugins you can get for Nuke (and pretty much every other VFX software too, these days). All you have to do is run the plugin, click the magical  button, and voila! You've got yourself a really nice denoise; far better than any other denoiser out there today with the click of a button. But what if I told you it could be even better?

Aside from manually adjusting all the sliders for each type of noise, there are four things you can do to improve your result. There are some slight differences between the latest version of the plugin (v4) and the current version a lot of studios still use (v3), which makes this article a little tricky to write, but I'll do my best to point out the differences where necessary.
Tip #1: Convert your image to log space!
Converting your plate to a logarithmic colourspace will usually give you a nicer result! When you do this, you have to tell Neat Video that the pixels coming into the plugin have a gamma shift. In v3, there is a "Linear Input" checkbox once you open up the Properties of the Reduce Noise node. In v4, there is an "Input Data Type" button in the bottom-left of Neat Video's GUI that looks like this:  and you can choose the "Gamma corrected" option from in there.
Tip #2: Manual Fine-Tune!

"Auto Profiling" is a start, but "Manual Fine-Tune" is a godsend. If you've been using Nuke 10 recently, you might not know of any additional options in Neat Video, as there is a major bug that prevents any icons showing on most of the buttons... With that in mind, here is how you "Manual Fine-Tune" your denoise.
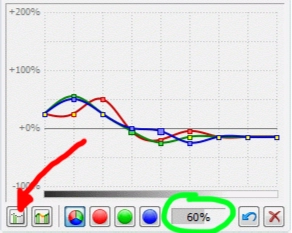
After clicking the "Auto Profile" button, click and drag the sample box to a new location (Neat Video expects a flat part of your plate to get an accurate noise sample). Next, click the "Manual Fine-Tune" button (follow the red arrow in the example image). You'll notice the curves in the graph will change slightly, and hopefully, the Quality Percentage indicator (circled green in the example image) will get closer to 100%!
Repeat this step as many times as you can, and your denoise should incrementally improve. If for some reason it doesn't, you're probably sampling areas of your plate that aren't flat colours.
Extra tip! If you have any reference plates for your shot, especially ones that include Grey Balls & Macbeth charts, you can use these! Simply hit "Apply" on Neat Video's GUI, change the input of the Reduce Noise node to said reference plate, and re-open Neat Video's GUI. Continue sampling flat-coloured areas and hitting the "Manual Fine-Tune" button, and your denoise will continue to improve!
Once you're finished, click the "Auto Fine-Tune" button (1 button to the right of the red arrow in the example image) and it will average out the remaining values it needs.
Tip #3: Play with the "Radius" and "Threshold (v3 only)" settings

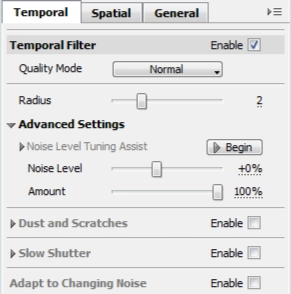
In Neat Video v3, this option is outside Neat Video's GUI, in your Reduce Noise node's properties panel. In Neat Video v4 (see example image), it's labelled properly under the "Temporal" tab and gives you way more control in the plugins' "Advanced Mode".
Like me, if you have only been using v3 up until this point, you might not know what the "Radius" option does. It's a temporal filter, which means Neat Video is using more than 1 frame of your plate to make sure it's returning the best result to you. Setting the slider to 2 will result in the current frame being analyzed, as well as the next & the previous 2 frames too (5 frames in total)! Adjusting this number makes your denoise slower to process, although generally makes it more accurate too.
Threshold (v3 only) also lives in the Reduce Noise node's properties panel, and determines how sensitive the aforementioned Temporal Filtering is. Higher values average pixels for smoother (and blurrier) results, whereas lower values give you more accurate edges & results. You should keep this value as low as you can get away with...
The Threshold option in v3 of the plugin has been replaced in v4 with an array of new options to help refine the temporal portion of your denoise, as seen in the example image!
Tip #4: Neat Video's Sharpening always needs work

Some plates are so grainy that they may require sharping after a heavy denoise. Because Neat Video is calculating your denoise profile, it makes sense that it would be able to sharpen your image without re-introducing noise. Although, the default settings are a bit heavy-handed...
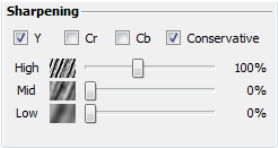
Check out the example image. What do those checkboxes mean? I recently wrote another article on When To Use A Different Colourspace, which includes what the YCrCb colourspace is and how it's best utilized. Neat Video is converting our image to the YCrCb colourspace, running the denoise first, the sharpening algorithm second, and finally converting back to linear. Thankfully some programmers know that this will always give us a nice result!
Although notice I've un-checked the Cr and Cb checkboxes? We only want to sharpen Y, which is the Luminance component of our image. This seems to give us a nicer result, with less banding around our edges. Check/uncheck the Conservative checkbox, and play with the 3 sliders until you get a more desirable result. If, on the odd occasion, Neat Video's sharpening doesn't provide a decent result, close out of the GUI and convert your image to Lab space after the Reduce Noise node, Sharpen the Red channel only (which is the luminance component of the image), and then convert back to linear.
Voila! Now you've made a good denoise even better! Of course, you can always adjust your "Noise Filter Settings", but the above 4 tips will get you most of the way towards an incredible denoise, with very little effort.
For more information, check out Neat Video's User Guide.