Back To Basics: How To Speed Up Your Nuke Scripts By Compositing Efficiently
There is always more than one way to solve a problem in Nuke, although some ways are definitely better than others. The aim of this post is to make you aware of the things you should & shouldn't do, so you can retain as much image quality as possible in your final comp, and work speedily without Nuke grinding to a halt.
Don't have multiple copies of the same Read node in your script
Nuke interprets individual Read nodes as their own process, even if the filepaths are the same. An example of where this could be detrimental: If you're copy/pasting the same multi-pass EXR around your Nuke script just to shuffle out individual channels in different places, you're essentially making Nuke re-think about each render pass in the EXR, many times over.
The best way to get around this is to use clearly-labelled postage stamps hooked up to the original Read node, with hidden inputs so they appear like a read node themselves. I usually don't condone the use of hidden inputs because they make your script infinitely harder to figure out for another artist, but in this case it's a reasonable compromise.
Additionally, if your script is still slow, you can turn the postage_stamp off for all your nodes so Nuke doesn't have to constantly keep updating tiny image previews. Here's a python script to do that easily:
1for i in nuke.allNodes():
2    i['postage_stamp'].setValue(0)
Reformat First
Every time you Read in a new plate, element, or render, you should be checking its format to make sure it's consistent with your project's format / the rest of the elements in your Nuke script. If it's not, the very next node you should be creating is a Reformat node to fix the issue!
Keeping the format consistent throughout your Nuke script helps in the following situations:
- It stops weird filtering math upon merging different formats together; it's better to define it yourself rather than having Nuke give you it's best guess.
- You will be 100% certain you're viewing everything in the right context throughout your Nuke Script. No more merging something into the B-pipe of your script and having things look different!
- Transform handles work as expected in the viewer (transforms, rotoshapes, etc.), as opposed to twisting and warping when you're trying to rotate and scale things.
Concatenate your Transforms
Nuke will automatically concatenate multiple Transform operations into one if your nodes are stacked together in the right order. This means, for example, three different transform nodes will only be processed as one operation under the hood, and therefore will only filter the image once! Ivan Busquets has written an incredibly informative tutorial on how concatenation works over on Nukepedia. Click here to read it!
This tutorial covers:
- What node concatenation is
- Which nodes concatenate
- What prevents nodes from concatenating
Only do things once, if you can...
It's easy to get caught in the trap of treating each element in your Nuke script as its own thing, and doing the same or similar processes more than once in the same script. This is bad for a few reasons:
- Nuke has to process the same operation more than once. Lots of small re-calculations add up to slower preview & render times!
- Updating your script with newer renders or elements breaks everything, and causes you to spend significantly more time re-balancing everything to look the same as it did before.
- Your Nuke script becomes too large, and therefore harder to read.
Contrary to what some may believe, having a smaller Nuke script that processes lots of operations efficiently makes you a better compositor, as opposed to simply using as many nodes as possible to look like you know what you're doing.
With all that in mind, I have thought of some specific examples of traps I've personally fell into in the past, and have noticed co-workers over the years doing quite often too.
1. Add Defocus nodes sparingly
Adding a defocus node for every element will significantly slow down your script, and can sometimes result in weird edges when merging into your B-pipe. In the real world, you focus your camera on one object and everything else that's out of focus blends together seamlessly because it's all part of the same image to begin with. This is what we should be trying to replicate in Nuke.
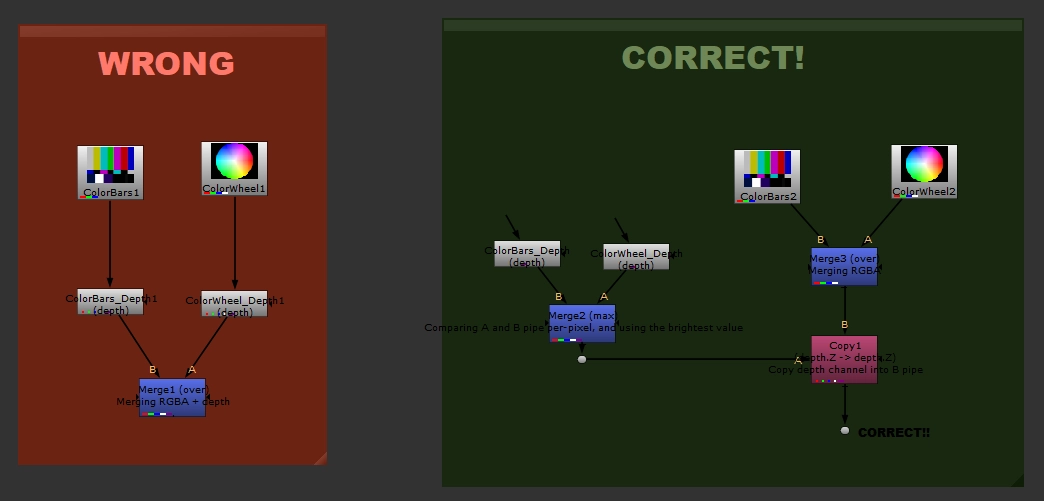
For CG Renders you should comp everything as usual for your RGBA channels, and combine your zDepth renders together in a different stream with a max operation, before copying depth into your B-pipe.
Because the zDepth pass is a 2D representation of where things are sitting in z-space, you can't easily merge (over) the depth channel into your B-pipe and expect things to work correctly. The max operation compares each pixel in the A and B pipes, and uses the brightest one as the result. Perfect for combining zDepth passes!

For Stock Elements, you can create your own zDepth pass by shuffling an unpremultiplied Alpha Channel --> Depth. Next, use a Grade node to adjust the depth channel to sit in the correct place in z-space.
Rather than having ten elements with ten different defocus nodes, you can set up one defocus node after your RGBA + depth channels are merged together correctly (as per the example above) and get the differing defocus levels for free, much more quickly!
(If you're working in Deep, you get all this depth information automatically via the DeepFromImage node.)
As always, there's an exception to the rule. If you have lots of transparent elements and/or soft edges (e.g. multiple light atmospheric smoke elements layered up), this methodology might make your image look funky. In this case, you would have to defocus each element separately, although the rule of thumb still applies: use as little nodes as you can get away with.
2. Only Regrain once
Grain nodes are another to add to the list of heavy processes, so the less you use, the faster your Nuke script operates!
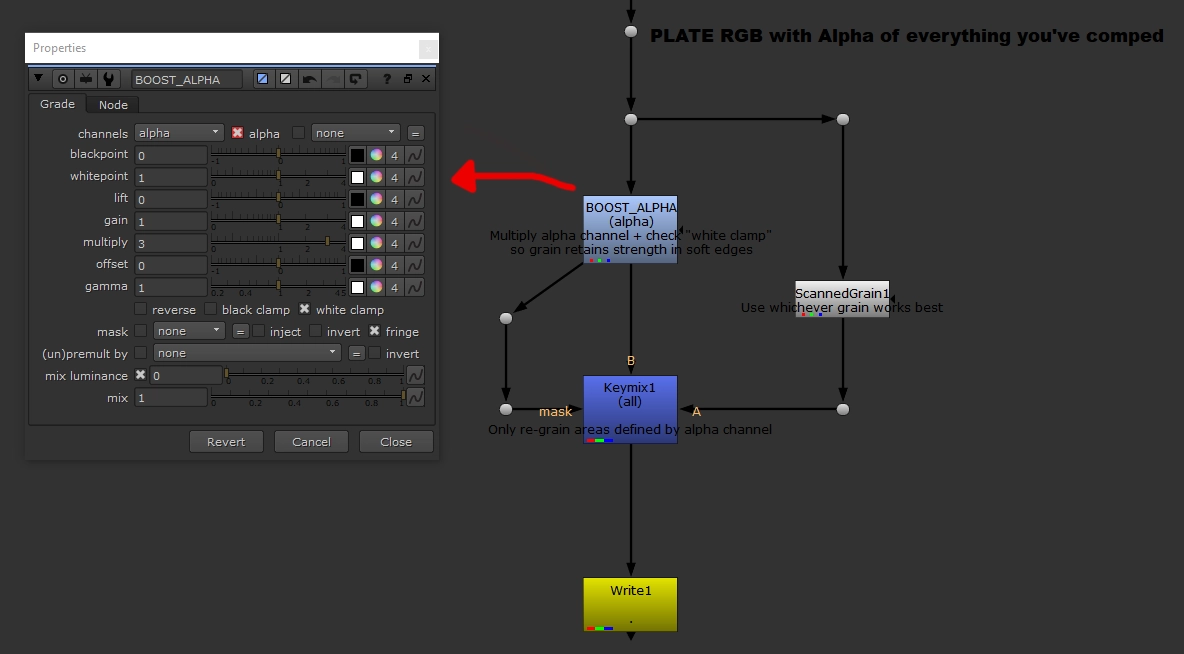
Rather than adding grain to every single element in your script, you can easily add grain to everything that needs it at the end of your script instead! Where possible, try to keep building up your alpha channel in your B-pipe so that at the end of your script, you can use the combined alpha channel of everything you've added or changed to re-introduce grain back into your shot. If this is not possible for any reason, you can always use a Difference node to find the difference between the end result of your comp and your plate, and then use the resulting alpha channel to re-grain things.

3. Make everything relative
For example, if you're grading in some atmospheric haze on multiple CG elements:
Don't grade every single element individually, and animate the grade as it gets closer to camera. This isn't very accurate, and leads to tears when you have to re-balance everything because lighting or animation changed...
Do combine your zDepth passes with a max operation, and use the result to grade atmospheric haze into all your CG elements in one go, after they've been comped together.
This not only saves processing power by using less nodes, but also saves your sanity as any inevitable changes from other departments won't break your comp!
If you must use two nodes with the same properties, you should expression-link the values so you only have to change one knob to update all the duplicates too. Do not clone nodes. Cloning appears useful at first, but is deceptive because:
- They often stop keyframes from appearing correctly in your timeline.
- If another artist has to open your script, they aren't as clear as expression-linked nodes / knobs.
- They can sometimes corrupt your entire Nuke script!
Keep your Bounding Box as small as possible
Any time your bounding box is bigger than it needs to be and is passed into another node, Nuke still has to calculate the pixels with zero value, where nothing in the image is being modified. This is quick to process for a grade node, but can slow things down with heavier nodes like Defocus' and Glows. You should aim to keep your bbox as small as possible at every stage of your script!
Here are some tips that I've found useful to make this easier:
- Set a Knob Default in your menu.py, so that the set bbox to knob in your merge node is B by default. Sometimes you don't want to do this, but you can always customize Nuke further for specific circumstances / different ways of working.
- Use the CopyBBox node to get the original bbox from your CG element.
- With a node selected, run
nukescripts.autocrop()in Nuke's Script Editor panel. This python script will automatically look at the node you've selected, and run through your set frame range to determine which pixels have things in them, and which don't (or which pixels have a value of zero). It then creates a crop node that is animated to contain only the pixels with information present. This is super useful for working with stock elements! - As a last resort, or if you're just really lazy, adding a crop node to your element before merging with the B-pipe helps!
Remove channels when you're not using them
Similar to keeping a small bounding box, it's important to remove channels from your Nuke script when you no longer need them. This saves Nuke from accidentally processing extra information you don't need. You can use the Remove node to do this.
Additionally, there is no point keeping a specific channel from the top of your script if you need to use it at the bottom. It's more efficient to keep RGBA only, and then use a Copy node to pipe the specific channel into the bottom of your script when you actually need to use it.
Keep your Nuke script organized as you create it
Human working speed is just as important as Nuke's processing speed. Here are some tips for keeping your script easily readable for yourself, and other artists who may have to open up your script:
- Make your B-pipe like a spine. Your script should have a clear center running from top to bottom, with elements merging into it. This makes it easy to connect the viewer to each step of the script and figure out what's going on.
- Spread your nodes out a bit. They don't have to be jammed tightly up against one-another!
- Label every Merge, Transform and Grade node -- most Nuke scripts contain a lot of these, and it's useful to know what each one is trying to accomplish.
- Use clearly-labelled, colour-coded backdrop nodes to highlight different parts of your script.
Miscellaneous Knowledge
- Using the Card3D node is way faster than using a regular Card with the usual 3D setup, but does exactly the same thing.
- Use the
$gui?1:0expression on a node's disable knob to speed up a script with slow nodes. This will disable a node when you view it in Nuke's GUI, and re-enable it when you render. This can be dangerous for other artists opening your script, so be sure to label nodes accordingly! - The TX_Disabler gizmo is a good alternative to quickly enabling/disabling multiple heavy nodes at once.