What's a menu.py, and why should I have one?
You may have heard other compositors refer to a menu.py, or a "preferences file" in the past. What the hell is that?!
A menu.py is a python file that Nuke will read upon starting up each time. It contains data such as:
- Keyboard shortcuts
- Knob defaults for specific nodes
- Custom python functions to customize the way Nuke works in certain areas
Most studios will have a menu.py to setup specific things for the entire studio, as well as a second menu.py file to change certain things on a per-show basis. But you can also create your own menu.py to customize things for you, and you only! There is a lot of power in customizing Nuke to work in the most efficient manner, based off the way you think and operate.
Getting Started
The first thing to do is to locate your .nuke folder. It's hidden by default, so you'll have to find the "show hidden files/folders" option in your OS.
Windows: C:\Users\<username>\.nuke
Mac: /Users/<login name>/.nuke
Linux: /home/<username>/.nuke
Look for a menu.py file. If it doesn't exist, create it!
Now, you're ready to get going! Any python you write in this file will execute next time you open Nuke!
First things first, over a few years of customizing things, your menu.py can get pretty large. Just like it's important to keep your Nuke scripts neat, tidy & labelled, it's important to do the same thing with code. My menu.py starts with some versioning details:
1# --------------------------------------------------------------
2# BEN MCEWAN'S CUSTOM NUKE SETTINGS
3# Version: 1.0.0
4# Last Updated: January 11th, 2018
5# --------------------------------------------------------------
In python, starting a line with a # means the entire line is a comment, and Nuke will ignore it. I'll update the version & date every time I make a change, so I'm always on top of if I'm using the latest version between work & home.
Second, I define a variable to tell Nuke where the .nuke directory lives:
1# Set .nuke directory. Don't end the filepath with a "", otherwise nuke will throw up an error.
2dir = 'C:\Users\Ben\.nuke'
This is so when I switch between different computers or operating systems, I just have to change this filepath once, rather than on many things.
Third, I like to "import" common modules Nuke uses. For example:
1# --------------------------------------------------------------
2# GLOBAL IMPORTS ::::::::::::::::::::::::::::::::::::::::::::::
3# --------------------------------------------------------------
4
5import nuke
6import nukescripts
7import os
These three modules are the most-commonly used in other people's python scripts. You don't need to have them in your menu.py right away, but you'll start to notice them being utilized pretty often! I find it useful to group all the modules I'm importing at the top of my menu.py, so I have an idea of what's being used at a glance, without having to scroll through my entire python file.
What is a module I hear you ask? It's an external python file that contains pre-defined definitions and statements (more python code, yay!). As a very basic example, you could create a "keyboardShortcuts.py" file to contain all your custom hotkeys, and then add "import keyboardShortcuts" to your menu.py to use them.
Notice that in all 3 examples, I use different ways to highlight comments? This is 100% a personal preference, but it's useful to standarize the way you comment a group of text, headings, and subheadings to make your menu.py easier to read and navigate.
Now you're ready to start adding things!!
Adding Keyboard Shortcuts
For our example, let's add the following code to our menu.py file, to make Ctrl+Alt+T create a Tracker node:
1nuke.menu('Nodes').addCommand("Transform/Tracker", "nuke.createNode('Tracker4')", "ctrl+alt+t", shortcutContext=2)
Now, in English...
First, we have to find the menu the node lives in, and then the node's "class name".
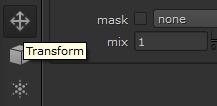
Hover your mouse over any item in the Nodes toolbar to get it's name:
... and here is the Tracker node! Let's create one.
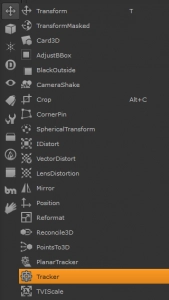
Notice the label in the menu says Tracker, and the node that has just been created is also called Tracker (appended by a number, depending on how many other Tracker nodes are in the script). That must mean the node's "class name" is Tracker too, right? WRONG!! With the Tracker node selected, hit "i" on your keyboard. It will pop up a dialog box with some information about the node.
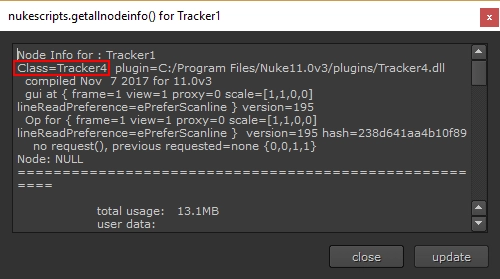
What??? A Tracker node's class name is actually Tracker4?! This is something to be careful of. For most nodes in Nuke, their class name is the same as the node's name in the menu. But sometimes as The Foundry continues to develop a node, they version them up as well!
So back to our code, let's go through the syntax, colour-coded for clarity:
nuke.menu('Nodes').addCommand("Transform/Tracker", "nuke.createNode('Tracker4')", "ctrl+alt+t", shortcutContext=2)
- We're looking for a menu in the Nodes panel
- We have to add the Tracker node into the Transform menu (it's already there, but we're essentially overwriting it with itself)
- Clicking this menu option we just created will create a Tracker4 node (class name, remember?)
- Now we can actually give it the shortcut of ctrl+alt+t!
- shortcutContext refers to which area of Nuke the shortcut refers to. It's not necessary to add, but it's good practice to be specific when coding. 0 = Window-level, 1 = Application-level and 2 = GUI/Node Graph.
Now, save your menu.py and open/restart nuke. Try pressing the ctrl+alt+t shortcut with your mouse over the node graph, and you should see a tracker node!
Setting Knob Defaults
Like setting shortcuts, it's just one line of code, but this time it's more human-readable! Let's set our Tracker node's shutter-offset knob to centered by default. First, the code, and underneath the human-readable syntax.
1nuke.knobDefault('Tracker4.shutteroffset', "centered")
2nuke.knobDefault('<node class name>.<node knob name>', "<value>")
Just like a node's label and class name can be different, the node's knob label and knob name can be different. With the Tracker node selected, you can hit "i" on your keyboard to bring up the node's information. If you scroll down, you'll see a list of all the node's knobs with the current value each of them have. You can also hover over any knob to find it's knob name.
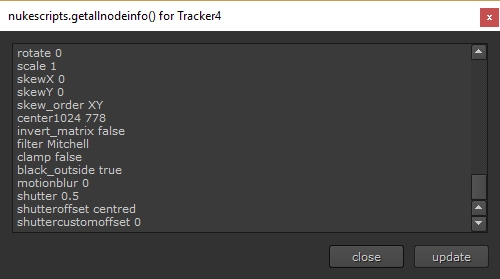
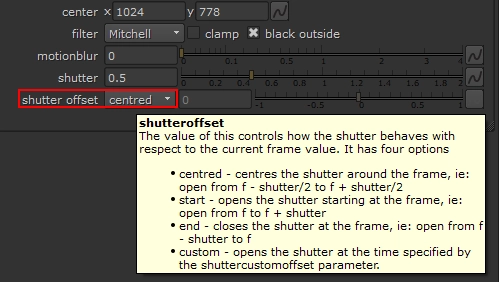
Simple, right?
To further this example, I've set the shutter offset to centered in every node that has this knob. In most cases, you always want this option, so it makes sense to set it as a default!
1nuke.knobDefault('Tracker4.shutteroffset', "centered")
2nuke.knobDefault('TimeBlur.shutteroffset', "centered")
3nuke.knobDefault('Transform.shutteroffset', "centered")
4nuke.knobDefault('CornerPin2D.shutteroffset', "centered")
5nuke.knobDefault('MotionBlur2D.shutteroffset', "centered")
6nuke.knobDefault('MotionBlur3D.shutteroffset', "centered")
Lastly, to further customize our Tracker node, we can give it a custom label with some basic TCL code to give us more information at a glance. Handy for scripts with multiple tracker nodes doing different things!
This:
1nuke.knobDefault('Tracker4.label', "Motion: [value transform]nRef Frame: [value reference_frame]")
Looks like this: ![]()
And that's it! You're now up to speed with the basics of customizing Nuke.
If you liked this post, and would like to gain a better understanding of the fundamentals of Python in Nuke, check out my course: Python for Nuke 101.